| | Development Kit Table of Contents | |
Creating a WorldsPlayer Interface
Overview
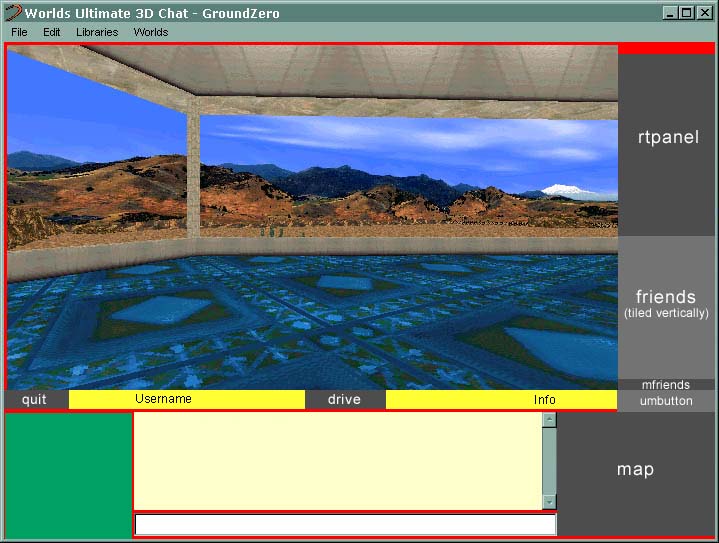
![]() Background Edges. This part of the WorldsPlayer interface is currently black. If you want this to be a different color, you'll have to specify an RGB value. NOTE: The space above the Help Button (the top of rtpanel) changes in height depending upon how large or small the user has the browser set.
Background Edges. This part of the WorldsPlayer interface is currently black. If you want this to be a different color, you'll have to specify an RGB value. NOTE: The space above the Help Button (the top of rtpanel) changes in height depending upon how large or small the user has the browser set.![]() Background. This part of the interface changes width as the user resizes the interface. It can be any RGB value to match your button art. The text that appears on this background (Username to the left of the drive button, Info to the right) is white unless otherwise specified (requires Worlds.com programming time).
Background. This part of the interface changes width as the user resizes the interface. It can be any RGB value to match your button art. The text that appears on this background (Username to the left of the drive button, Info to the right) is white unless otherwise specified (requires Worlds.com programming time). ![]() Ad Cube. Several ads are served on this rotating "cube". A 128 x 128 8-bit .bmp files are required.
Ad Cube. Several ads are served on this rotating "cube". A 128 x 128 8-bit .bmp files are required.![]() Interface Artwork. These are the parts of the interface that have buttons with "rollover" and "selected" effects.
Interface Artwork. These are the parts of the interface that have buttons with "rollover" and "selected" effects.
NOTE ON TEXT COLOR:
Any text on the interface that is programmed (Username, Info to right of drive button, Friends Online list, actions list on Actions pop-up window, text on Change Avatar pop-up window) is white unless otherwise specified. Changing this text color requires Worlds.com programming time.
Creating the Artwork
Click on the download link for sample gifs and Photoshop files:
Download (1.4 MB)
Buttons
There are six parts to the WorldsPlayer interface buttons:
| Right Panel 97 x 182 IMPORTANT NOTE: The size of the button area and order in which they are presented on this panel cannot change. For example, the Help button must be at the top and the button area remain 23 pixels high. In the Photoshop file Interface.psd, please use the guides to determine where the buttons are placed. For further reference, the heights of each button area are listed next to the image at right. |
 |
| Friends 97 x 11 Tiles vertically beneath the right panel, the number of times it tiles depends on the size of the user's browser window. The version at right is the state used when a friend is online - the program writes the friends name on top of this gif. |
|
| More Friends 97 x 11 The end of the friends list. It's normally empty (null state). If a user's Friends Online list gets filled up, this section changes to a button that says "More Friends..." |
|
| Universe Map Button 98 x 22 Note that the bottom of this gif needs match the Background Edge color (black in this case). |
|
| Drive Button 81 x 19 |
|
| Quit Button 65 x 19 |
Each of the final gifs for the buttons contains four button states: null, normal, rollover, and selected. The final form for each gif looks like this:
![]()
The quit.gif above is four times the width of the quit button (65 x 4 = 260). The first section on the left is the "null" state, the next section is "normal", the third section is the "rollover" state, and the last section is the "selected" state. Within the Samples folder, there is a folder titled Interface. Please look at all the gifs in this folder. These are examples of all the finished gifs for the interface. Use Interface.psd to help you design the interface as a whole.
Map
The map in the lower right corner of the WorldsPlayer interface changes for each world the user enters. It can contain as many or as few teleport links as you want (or as will fit!). The image is 158 x 124, and the final gif should be in the same form as the other interface gifs:

Each button area or "hot spot" needs to be square or rectangular. In the sample below, the areas for four of the buttons are outlined in blue. Along with the final gif, we will need the coordinates of all the hot spots. For example, the top left corner of the map image is considered 0,0, so the Home button on the example below is located at 117,0 (it's top left corner is 117 pixels over, 0 pixels down). The width and height of the area is 41 x 28. So the coordinates you would give us for that button would be "Home: 117 0 41 28". See the meteor-mapEXAMPLE1.gif and meteor-mapEXAMPLE2.gif in the Samples/Interface folder.
Pop-Up Windows
There are five pop-up windows:
| Actions Top: 142 x 65 Middle: 71 x 15 Bottom: 142 x 8 This window comes up when the Actions button on the WorldsPlayer interface is pressed. This window is divided into three parts: top, middle and bottom. The top part contains the instructions - this text must not be changed (change the color if you need to). The middle part is the action button which gets tiled within the window. The program writes the names of the actions over this gif (be sure to leave room for this text). The bottom is simply the....bottom. Use the Photoshop file ActionsWindow.psd as reference. |
 |
| Hang On! Teleporting... 200 x 50 Cancel Button: 61 24 84 20 This window appears whenever a user teleports to another world. |
 |
| Change Avatar 177 x 47 Yes button: 39 23 48 18 No button: 96 23 48 18 This window pops up when an avatar is chosen in the Avatar Gallery. This gif needs blank space at the top for the program to write the text, "Do you want to change to avatar fill in the blank?" |
|
| More Info 244 x 47 Yes button: 48 22 60 19 No button: 139 22 54 19 This window pops up when an item in the 3D store is click on or when the user clicks on various other clickable objects in the worlds. |
|
| Do You Really Want to Quit? 260 x 173 Yes button: 141 76 78 22 No button: 141 114 78 22 Pops up when Quit button is pressed. |
 |
The gifs for four of the pop-ups (hangon, changeav, moreinfo, dyrwtq) have the familiar null, normal, rollover, and selected states:

The current coordinates for the buttons on these pop-ups are listed above. If you change the location of these buttons, we will need the new coordinates of each area (x and y location of upper left corner plus width and height).
The actions pop-up is divided into three separate gifs (see sample above). Use the Photoshop file ActionsWindow.psd as reference.
Within the Samples folder, there is a folder titled PopUps. Please look at all the gifs in this folder. These are examples of all the finished gifs for the pop-up windows.
Splash Screen

The Splash Screen appears each time the WorldsPlayer is run. You can design it however you like, but it requires the following:
- It needs to be a 400 x 300 8-bit gif
- Worlds.com copyright information
- a small Worlds.com logo (see wrlds_logo_smtag.eps - you may change the size of the logo, but the text must be legible)
- Worlds.com's web address.
We'll need two gifs, the base 400 x 300 graphic without the text "Please Wait..." and then a separate "Please Wait" graphic that will get overlaid on top of the base graphic: ![]() We'll also need the x,y placement of the upper left corner of the Please Wait graphic. Use Worlds_Splash.psd as reference.
We'll also need the x,y placement of the upper left corner of the Please Wait graphic. Use Worlds_Splash.psd as reference.
Install Screen
The Install Screen is basically a larger version of the Splash Screen. It needs to be a 500 x 375 8-bit gif, and you need to leave room at the bottom of the gif for the install buttons.
Desktop Icon
![]()
The desktop icon for your branded version of WorldsPlayer will appear on the user's desktop when they install the program. This icon is also used in the upper left corner of the WorldsPlayer browser (it gets scaled by Windows so the result is not always pretty). To create your icon, it helps to use an icon editing application such as IconEdit Pro (Download IconEdit Pro Here). Your icon must be in the following format:
- 32 x 32
- 16 color (icon programs such as IconEdit Pro have the palette you'll need)
- save your icon in the .ico format
Finished Art
1. If you're changing the Background Edge, Background, and/or Text color (on interface), you'll need to send the RGB values for those colors.
2. Send coordinates for pop-up window buttons (if changed), map hot spots, position of "Please Wait..." on Splash Screen.
3. All of the final art needs to be sent as 8-bit .gif files with the exception of the ad cube art which needs to be an 8-bit .bmp file and the icon which is a 16 color .ico file. Below are the file names to be used:
Interface
YourCompany_rtpanel.gif
YourCompany_friends.gif
YourCompany_mfriends.gif
YourCompany_umbutton.gif
YourCompany_drive.gif
YourCompany_quit.gif
worldname-map.gif
YourCompany_adname.bmp
Pop Up Windows
YourCompany_hangon.gif
YourCompany_moreinfo.gif
YourCompany_changeav.gif
YourCompany_dyrwtq.gif
YourCompany_actt.gif
YourCompany_actm.gif
YourCompany_actb.gif
Other
YourCompany_splash.gif
YourCompany_pleasewait.gif
YourCompany_install.gif
YourCompany_icon.ico
Any questions, contact Julie at julier@worlds.com
Updated 09/25/00